Difference between revisions of "Phone Stand Tutorial"
Jump to navigation
Jump to search
| Line 66: | Line 66: | ||
|- | |- | ||
| | | | ||
| − | <ol start=" | + | <ol start="5"> |
<li>Extrude the Back and Front</li> | <li>Extrude the Back and Front</li> | ||
<ol> | <ol> | ||
| Line 78: | Line 78: | ||
|- | |- | ||
| | | | ||
| − | <ol start=" | + | <ol start="6"> |
<li>Sketch the back cutout</li> | <li>Sketch the back cutout</li> | ||
<ol> | <ol> | ||
| Line 89: | Line 89: | ||
|- | |- | ||
| | | | ||
| + | <ol start="7"> | ||
| + | <li>Cut out the back</li> | ||
| + | <ol> | ||
| + | <li> Click on the '''Extusion Tool''', but instead of New or Add, select '''Remove''' instead. </li> | ||
| + | <li> Select the Back Cutout sketch as the '''Faces and sketch regions to extrude'''.</li> | ||
| + | <li> In the dropdown, select '''Up to face''' to allow us to cut up to an existing side of our model. </li> | ||
| + | <li> In the '''Up to face''' box, select the back side of the front lip. </li> | ||
| + | </ol> | ||
| + | </ol> | ||
| + | |[[File:PhoneStand_Step7_RemoveBack.PNG|thumb|400px]] | ||
| + | |- | ||
| + | | | ||
| + | <ol start="8"> | ||
| + | <li>Adding text to the front</li> | ||
| + | <ol> | ||
| + | <li> Create a new '''Sketch''' on the front of the stand. </li> | ||
| + | <li> Use the '''Text Tool''' to add text to the front. </li> | ||
| + | <li> Use the '''Dimension Tool''' to make it '''10mm''' tall.</li> | ||
| + | </ol> | ||
| + | </ol> | ||
| + | |[[File:Step8_AddText.PNG|thumb|400px]] | ||
| + | |- | ||
| + | | | ||
| + | <ol start="9"> | ||
| + | <li>Centering the Text sketch</li> | ||
| + | <ol> | ||
| + | <li> We want to center the text in the front of the stand. </li> | ||
| + | <li> In the sketch where we added the text, select the '''Line Tool'''. </li> | ||
| + | <li> Click on the '''Construction''' tool to make our lines become a dotted construction line. </li> | ||
| + | <li> Make two construction lines, one connecting the top of the text to the top of the front, and one connecting the bottoms. </li> | ||
| + | <li> With both lines selected, click on the '''Equal''' relationship in the top toolbar. This will force the two lines to be equal length, centering the text. </li> | ||
| + | </ol> | ||
| + | </ol> | ||
| + | |[[File:PhoneStand_Step9_CenterTheText.PNG|thumb|400px]] | ||
| + | |- | ||
| + | | | ||
| + | <ol start="10"> | ||
| + | <li>Extrude Text</li> | ||
| + | <ol> | ||
| + | <li> Select the '''Extrude Tool''', and select the sketch containing the front text. </li> | ||
| + | <li> Create a '''Blind''' extrusion of '''1.7mm'''</li> | ||
| + | </ol> | ||
| + | </ol> | ||
| + | |[[File:PhoneStand_Step10_ExtrudeText.PNG|thumb|400px]] | ||
| + | |- | ||
| | | | ||
| + | <ol start="11"> | ||
| + | <li>Round over edges</li> | ||
| + | <ol> | ||
| + | <li> Select the '''Fillet''' tool in the top toolbar.</li> | ||
| + | <li> Change the '''Radius''' to '''2mm'''.</li> | ||
| + | <li> Select as many edges as you want to round over to give a nice smooth appearance.</li> | ||
| + | </ol> | ||
| + | </ol> | ||
| + | |[[File:PhoneStand_Step11_RoundEdges.PNG|thumb|400px]] | ||
|} | |} | ||
| + | |||
| + | And you are done! Congratulations! | ||
| + | |||
| + | == Bonus Goals == | ||
| + | * Modify the overall Height and Width of the model to fit the height/width of your phone. | ||
| + | * Split the 2mm fillet into multiple fillets of different radii, to achieve different appearances. | ||
| + | |||
Revision as of 08:35, 29 July 2018
This Phone Stand is a perfect beginner project for learning Computer Aided Design (CAD). This tutorial will walk you through creating a custom Phone Stand using Onshape, a free browser-based CAD program.

Originally created for the 4H Students by Christopher Hoffman for the 4H Visit in July 2018.
Prerequisites
No previous CAD experience required! An Onshape account is necessary to follow along.
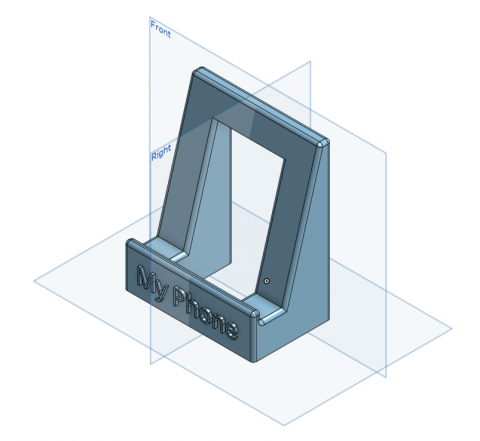
Finished Project
The finished Onshape project can be found here. Feel free to use it as reference to see step-by-step instructions, or make a copy of it and modify it.
Tutorial
| Instructions | Visual |
|---|---|
|
|
|
|
|
|
|
|
|
|
|
|
|
|
|
|
|
|
|
|
|


And you are done! Congratulations!
Bonus Goals
- Modify the overall Height and Width of the model to fit the height/width of your phone.
- Split the 2mm fillet into multiple fillets of different radii, to achieve different appearances.
Where to go from here
Now that you have a custom 3D Model, you should make it! Category:3DPrinting would be the best way to go!