Difference between revisions of "Phone Stand Tutorial"
Jump to navigation
Jump to search
| Line 54: | Line 54: | ||
</ol> | </ol> | ||
| [[File:PhoneStand_Step3_BackSketch.PNG|thumb|400px]] | | [[File:PhoneStand_Step3_BackSketch.PNG|thumb|400px]] | ||
| + | |- | ||
| + | | | ||
| + | <ol start="4"> | ||
| + | <li>Sketch the Front</li> | ||
| + | <ol> | ||
| + | <li> Select the left face of the base, and click '''Sketch''' to make a sketch on the side of the base. </li> | ||
| + | <li> Using the '''Rectangle Tool''', create a box that is 7mm by 5mm. | ||
| + | </ol> | ||
| + | </ol> | ||
| + | |[[File:Step4_FrontSketch.PNG|thumb|400px]] | ||
| + | |- | ||
| + | | | ||
| + | <ol start="4"> | ||
| + | <li>Extrude the Back and Front</li> | ||
| + | <ol> | ||
| + | <li> Click the '''Extrude Tool''' and select the two sketches we made in Steps 3 and 4 (the Back and Front sketches)</li> | ||
| + | <li> In the Dropdown, select '''Up to face'''. This will allow us to extrude up to an existing side of our part. </li> | ||
| + | <li> In the '''Up to face''' box, select the right side of the base </li> | ||
| + | <li> The two sides should now be flush with the sides of the base. Click the Checkbox to save the extrusion.</li> | ||
| + | </ol> | ||
| + | </ol> | ||
| + | |[[File:Step5_ExtrudeBackAndFront.PNG|thumb|400px]] | ||
| + | |- | ||
| + | | | ||
| + | <ol start="5"> | ||
| + | <li>Sketch the back cutout</li> | ||
| + | <ol> | ||
| + | <li> Create a new '''Sketch''' on the back face of the stand. </li> | ||
| + | <li> Using the '''Rectangle Tool''', make a box with the bottom line on the bottom edge of the stand. </li> | ||
| + | <li> Use the '''Dimension Tool''' to make the sides of the box '''20mm''' from each edge, and the top '''15mm''' from the top edge </li> | ||
| + | </ol> | ||
| + | </ol> | ||
| + | |[[File:PhoneStand_Step6_BackCutoutSketch.PNG|thumb|400px]] | ||
| + | |- | ||
| + | | | ||
| + | | | ||
|} | |} | ||
Revision as of 07:55, 29 July 2018
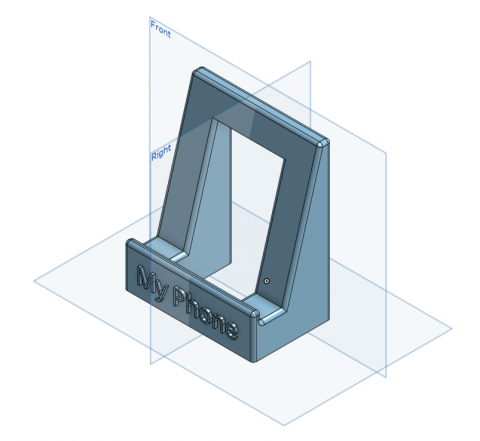
This Phone Stand is a perfect beginner project for learning Computer Aided Design (CAD). This tutorial will walk you through creating a custom Phone Stand using Onshape, a free browser-based CAD program.

Originally created for the 4H Students by Christopher Hoffman for the 4H Visit in July 2018.
Prerequisites
No previous CAD experience required! An Onshape account is necessary to follow along.
Finished Project
The finished Onshape project can be found here. Feel free to use it as reference to see step-by-step instructions, or make a copy of it and modify it.
Tutorial
| Instructions | Visual |
|---|---|
|
|
|
|
|
|
|
|
|
|
|
|


Where to go from here
Now that you have a custom 3D Model, you should make it! Category:3DPrinting would be the best way to go!