Difference between revisions of "Phone Stand Tutorial"
Jump to navigation
Jump to search
| Line 1: | Line 1: | ||
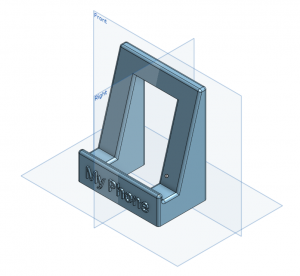
This Phone Stand is a perfect beginner project for learning Computer Aided Design (CAD). This tutorial will walk you through creating a custom Phone Stand using Onshape, a free browser-based CAD program. [[File:PhoneStand_Final.PNG|border|right|300px|Finished Project]] | This Phone Stand is a perfect beginner project for learning Computer Aided Design (CAD). This tutorial will walk you through creating a custom Phone Stand using Onshape, a free browser-based CAD program. [[File:PhoneStand_Final.PNG|border|right|300px|Finished Project]] | ||
| + | |||
| + | Originally created for the 4H Students by [[User:Choffman|Christopher Hoffman]] for the 4H Visit in July 2018. | ||
== Prerequisites == | == Prerequisites == | ||
| Line 5: | Line 7: | ||
== Finished Project == | == Finished Project == | ||
| − | The finished Onshape project [https://cad.onshape.com/documents/840eaa242732fdc08466af17/w/d5b1ec61be829efdda729bae/e/98a955f2e0f75c76877ba6f8 can be found here]. | + | The finished Onshape project [https://cad.onshape.com/documents/840eaa242732fdc08466af17/w/d5b1ec61be829efdda729bae/e/98a955f2e0f75c76877ba6f8 can be found here]. Feel free to use it as reference to see step-by-step instructions, or make a copy of it and modify it. |
| Line 15: | Line 17: | ||
|- | |- | ||
| | | | ||
| − | | | + | <ol start="1"> |
| + | <li>Create the Base Sketch</li> | ||
| + | <ol> | ||
| + | <li> Create a new sketch by clicking on '''Sketch''' button in the top toolbar.</li> | ||
| + | <li> Make sure the '''Sketch Plane''' is the '''Right Plane'''. </li> | ||
| + | <li> Using the '''Rectangle Tool''', create a new rectangle with one corner at the '''origin'''. </li> | ||
| + | <li> Use the '''Dimension Tool''' and make the box '''50 mm''' wide and '''20 mm''' tall. </li> | ||
| + | </ol> | ||
| + | </ol> | ||
| + | | [[File:PhoneStand_Step1_BaseSketch.PNG|thumb|400px]] | ||
|- | |- | ||
| | | | ||
| − | | | + | <ol start="2"> |
| + | <li>Extrude the Base</li> | ||
| + | <ol> | ||
| + | <li> Create a new '''Extrude''' feature using the extrude tool in the top toolbar.</li> | ||
| + | <li> Select the base sketch created in the previous step.</li> | ||
| + | <li> Select the following options: | ||
| + | * '''New''': to create a new part | ||
| + | * '''Symmetric''': extrudes the part equally in both directions | ||
| + | * '''Depth 83mm''': the total distance extruded | ||
| + | </li> | ||
| + | </ol> | ||
| + | </ol> | ||
| + | | [[File:PhoneStand_Step2_ExtrudeBase.PNG|thumb|400px]] | ||
|- | |- | ||
| | | | ||
Revision as of 21:19, 28 July 2018
This Phone Stand is a perfect beginner project for learning Computer Aided Design (CAD). This tutorial will walk you through creating a custom Phone Stand using Onshape, a free browser-based CAD program.

Originally created for the 4H Students by Christopher Hoffman for the 4H Visit in July 2018.
Prerequisites
No previous CAD experience required! An Onshape account is necessary to follow along.
Finished Project
The finished Onshape project can be found here. Feel free to use it as reference to see step-by-step instructions, or make a copy of it and modify it.
Tutorial
| Instructions | Visual |
|---|---|
|
|
|
|


Where to go from here
Now that you have a custom 3D Model, you should make it! Category:3DPrinting would be the best way to go!